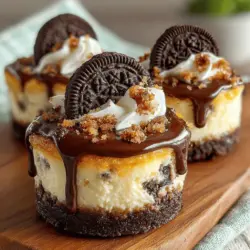
When it comes to indulgent desserts, few can rival the charm and appeal of a cheesecake. The creamy texture, the rich flavors, and the delightful crust make it a perennial favorite among dessert lovers. However, what if you could enjoy all the luxuriousness of cheesecake without the hassle of baking? Enter the Decadent No-Bake Oreo Cheesecake Cups—an exquisite treat that captures the essence of a classic cheesecake while offering a simpler, more accessible approach. Perfect for any occasion, these delightful cups combine the beloved flavors of Oreo cookies and creamy cheesecake, making for an irresistible dessert that is sure to impress your family and friends.
The Allure of No-Bake Desserts
No-bake desserts have surged in popularity over the years, and it’s easy to see why. These treats allow home bakers to whip up delicious confections without the need for an oven, making them an ideal choice for anyone looking to save time while still creating something impressive. Whether you’re short on time or simply want to avoid the heat of the kitchen, no-bake recipes offer a stress-free alternative that guarantees satisfaction.
One of the most significant advantages of no-bake desserts is their simplicity. With fewer steps and less equipment required, these recipes are often quicker to prepare, allowing you to spend less time in the kitchen and more time enjoying the company of loved ones. Additionally, no-bake desserts are versatile, making them perfect for a variety of occasions—from casual family dinners to festive gatherings.
Imagine serving these Decadent No-Bake Oreo Cheesecake Cups at your next gathering. Their individual servings not only look elegant but also make portion control a breeze. You can prepare them in advance, ensuring that you have a delectable dessert ready to go when your guests arrive. Plus, who can resist the combination of creamy cheesecake and crunchy Oreo cookies? It’s a match made in dessert heaven.
Ingredients Overview
Creating these Decadent No-Bake Oreo Cheesecake Cups requires a handful of simple yet flavorful ingredients. Each component plays a crucial role in delivering the rich taste and satisfying texture that this dessert is known for.
Oreo Cookies: The Star of the Show
Oreo cookies are undoubtedly the highlight of this recipe. Their chocolatey exterior and creamy filling provide the perfect balance of flavors and textures. Not only do they serve as the base for the crust, but they also add a delightful crunch that complements the smoothness of the cheesecake filling. Using Oreos in both the crust and as a topping enhances the dessert’s visual appeal and flavor profile, creating a decadent experience in every bite.
Unsalted Butter: Why It’s Used in the Crust
Unsalted butter is essential for binding the Oreo crumbs together and creating a cohesive crust. By using unsalted butter, you can control the saltiness of the dessert, allowing the sweetness of the Oreos and the richness of the cheesecake to shine through. The melted butter not only provides moisture but also adds a rich flavor that elevates the overall taste of the crust.
Cream Cheese: The Base for the Cheesecake Filling
Cream cheese is the cornerstone of any cheesecake recipe, and this one is no exception. Its smooth and creamy texture forms the foundation of the filling, giving it that signature cheesecake richness. When combined with other ingredients, cream cheese creates a luscious, velvety consistency that is both satisfying and indulgent.
Powdered Sugar: For Sweetness and Texture
To achieve the perfect level of sweetness in your cheesecake filling, powdered sugar is the ideal choice. Unlike granulated sugar, powdered sugar dissolves easily, ensuring a smooth and creamy mixture without any graininess. It helps to balance the flavors and contributes to the overall texture of the filling, making it light and airy.
Vanilla Extract: Enhancing Flavors
A splash of vanilla extract is a must in this recipe. It enhances the flavors of the cream cheese and sugar, adding depth and warmth. The combination of vanilla with the chocolatey Oreos creates an irresistible flavor profile that will have everyone coming back for seconds.
Heavy Whipping Cream: Achieving the Perfect Mousse-Like Texture
Heavy whipping cream is crucial for achieving that light and airy texture characteristic of no-bake cheesecakes. When whipped to soft peaks, it adds volume and lightness to the filling, creating a mousse-like consistency that melts in your mouth. This creamy element elevates the dessert, making it feel luxurious and indulgent.
Optional Chocolate Sauce and Extra Crushed Oreos: For Decoration and Added Flavor
For those looking to take their cheesecake cups to the next level, optional chocolate sauce and extra crushed Oreos can be used for decoration. Drizzling chocolate sauce over the top adds an extra layer of sweetness and visual appeal, while additional crushed Oreos provide a delightful crunch that enhances the overall experience. These optional toppings not only make the dessert look stunning but also allow for customization based on personal preferences.
Step-by-Step Preparation
Now that you have a better understanding of the ingredients, it’s time to dive into the preparation of your Decadent No-Bake Oreo Cheesecake Cups. The process is straightforward and can be broken down into two main parts: preparing the crust and creating the cheesecake filling.
Preparing the Crust
The first step in creating these delightful cheesecake cups is to prepare the crust. Start by gathering your Oreo cookies and unsalted butter. You will need about 24 Oreo cookies for the crust, which will yield enough crumbs to create a solid base for your cheesecake filling.
1. Crush the Oreos: Place the Oreo cookies in a food processor and pulse until they are finely crushed. Alternatively, you can place them in a resealable plastic bag and crush them with a rolling pin. Aim for a consistency similar to sand; this will ensure a sturdy crust.
2. Combine with Butter: In a mixing bowl, combine the crushed Oreos with melted unsalted butter. The butter should be melted to help bind the crumbs together. Stir the mixture until all the crumbs are evenly coated and the texture resembles wet sand.
3. Achieve the Right Consistency: It’s important to ensure that the mixture holds together when pressed. If it seems too dry, you can add a little more melted butter, a teaspoon at a time, until you reach the desired consistency.
Layering the Crust in Serving Cups
Once you have your crust mixture ready, it’s time to layer it into your serving cups. This no-bake cheesecake recipe works wonderfully in individual cups, making it easy to serve and enjoy.
1. Press Down the Crust: Spoon a portion of the Oreo crust mixture into the bottom of each serving cup. Use the back of a spoon or your fingers to press the mixture down firmly. Aim for an even layer that covers the bottom of the cup entirely.
2. Create a Solid Base: It’s crucial to create a solid base for the cheesecake filling to sit on. Make sure to press down firmly enough so that the crust holds its shape when you add the filling. This will ensure that each bite has that perfect balance of cheesecake and crust.
With the crust prepared and layered in the cups, you’re well on your way to creating the Decadent No-Bake Oreo Cheesecake Cups. The next step will involve mixing the creamy cheesecake filling, but we’ll delve into that in the next section. Stay tuned for the delightful process of creating this luxurious dessert!
Importance of Softened Cream Cheese for Texture
Achieving the perfect cheesecake filling starts with the right texture, and softened cream cheese is crucial for this. When cream cheese is at room temperature, it becomes creamy and pliable, allowing it to blend seamlessly with other ingredients. If your cream cheese is cold, it can result in a lumpy filling that lacks the smoothness you desire in a cheesecake. To soften cream cheese effectively, you can either leave it out at room temperature for about an hour or microwave it in short bursts of 10-15 seconds, checking to ensure it doesn’t melt.
Incorporating Sugar and Vanilla
Once your cream cheese is softened, it’s time to elevate the flavor. Incorporating granulated sugar and pure vanilla extract is essential in this step. The sugar adds the necessary sweetness to counterbalance the tanginess of the cream cheese, while vanilla extract brings warmth and depth to the flavor profile. For this recipe, use about ½ cup of sugar and 1 teaspoon of vanilla extract. Mix these ingredients until they are well-combined and smooth, ensuring that there are no clumps of sugar left.
The Role of These Ingredients in Flavor Enhancement
The combination of softened cream cheese, sugar, and vanilla extract creates a luscious base for your cheesecake filling. The sugar not only sweetens but also helps in achieving a silky-smooth consistency when mixed with cream cheese. The vanilla extract acts as a flavor enhancer, making the dessert experience more delightful. This harmonious blend is what makes the no-bake Oreo cheesecake cups so irresistible.
Whipping the Cream
Next, we move on to whipping the cream, another vital step in creating the airy texture of the cheesecake filling. For this recipe, heavy whipping cream is the star. Use about 1 cup of heavy cream, and make sure it’s cold for the best results.
Step-by-Step Instructions for Achieving Stiff Peaks
1. Chill Your Mixing Bowl and Whisk: For optimal whipping, chill your mixing bowl and whisk (or beaters) in the freezer for about 10-15 minutes before starting. Cold equipment helps the cream to whip faster and increases its volume.
2. Start Whipping: Pour the cold heavy cream into the chilled bowl. Begin mixing on low speed, gradually increasing to medium-high.
3. Monitor the Consistency: Keep an eye on the cream as you whip. After about 2-3 minutes, you should start to see soft peaks forming.
4. Achieve Stiff Peaks: Continue whipping until you reach stiff peaks. This means that when you lift the whisk, the cream holds its shape and doesn’t droop. Be careful not to over-whip, as this can turn the cream into butter.
Importance of Gently Folding to Maintain Airiness
After whipping the cream, it’s time to incorporate it into your cream cheese mixture. This step is crucial for maintaining the light and airy texture of the cheesecake filling. Use a rubber spatula to gently fold the whipped cream into the cream cheese mixture. Start by adding a small portion of the whipped cream to lighten the cream cheese base, then gradually fold in the rest. The key here is to incorporate without deflating the whipped cream, so use a gentle hand and a folding motion rather than stirring.
Assembling the Oreo Cheesecake Cups
Now comes the fun part: assembling your Oreo cheesecake cups!
Layering the Cheesecake Filling
Begin by preparing your serving cups. Clear glass cups or mason jars work wonderfully for this dessert, as they allow the beautiful layers to be visible. Start with a layer of the cheesecake filling. Use a spoon or a piping bag for more control when adding the filling to the cups.
Techniques for Spooning and Leveling the Filling
To ensure an even layer, use the back of a spoon to spread and level the cheesecake filling. You want each layer to be smooth and uniform, so take your time with this step.
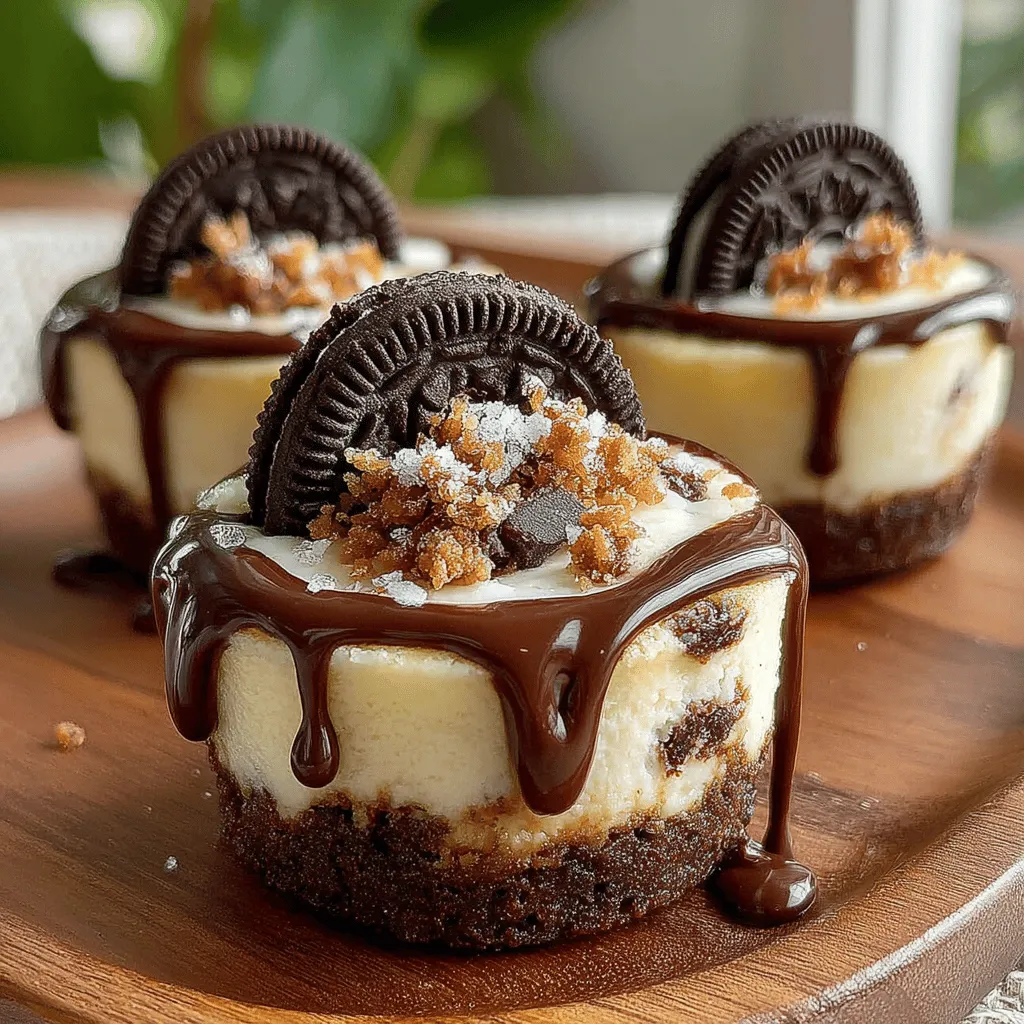
Strategic Placement of Whole Oreo Cookies for Presentation
For added visual appeal and flavor, place a whole Oreo cookie on top of the first layer of filling. This not only enhances the Oreo flavor but also creates a delightful surprise as your guests dig into the dessert.
Repeating the Layers
Guidelines on Maintaining Balance in Each Cup
After layering the first filling and cookie, repeat the process. Add another layer of cheesecake filling, followed by another whole Oreo cookie. Depending on the size of your cups, you can create two or three layers.
Visual Appeal of Multiple Layers
Multiple layers not only make your dessert look stunning but also provide a delightful mix of textures and flavors in every spoonful. Aim for a balanced look, ensuring that no layer is too thick or too thin compared to the others.
Chilling and Serving
Once your cups are assembled, it’s time to chill them for the flavors to meld together beautifully.
Importance of Chilling for Texture and Flavor Development
Chilling the cheesecake cups is essential for achieving the right texture. It allows the filling to set and the flavors to develop. Without proper chilling, your cheesecake cups may not hold their shape when served.
Recommended Chilling Times and What to Expect
For the best results, chill your cheesecake cups in the refrigerator for at least 4 hours, although overnight is preferable. After this time, the filling will be firm yet creamy, providing a delightful mouthfeel.
Presentation Tips
When ready to serve, consider adding a few finishing touches for an impressive presentation. Drizzling chocolate sauce over the top of each cup can add a touch of elegance. You can also sprinkle crushed Oreos or mini chocolate chips to enhance the visual appeal.
Creative Ideas for Drizzling Chocolate Sauce
You can make your own chocolate sauce by melting semi-sweet chocolate mixed with a little bit of cream or store-bought sauce will work just fine. Use a spoon or a squeeze bottle to create an artistic drizzle over the top of each cup.
Options for Garnishing with Crushed Oreos
For an extra Oreo touch, crush a few cookies in a zip-top bag and sprinkle the crumbs on top of the cheesecake cups just before serving. This not only enhances the flavor but also adds a bit of crunch.
Healthier Alternatives and Variations
If you’re looking to lighten this decadent dessert, there are several ways to make it healthier without compromising flavor.
Suggestions for Lighter Versions
Consider using low-fat cream cheese or Greek yogurt in place of regular cream cheese. This can significantly cut down on calories and fat while still maintaining a creamy texture. You can also substitute granulated sugar with a natural sweetener like stevia or monk fruit sweetener, adjusting to taste.
Ideas for Flavor Variations
Don’t be afraid to get creative! You can incorporate different flavors by adding extracts such as almond or mint, or by using flavored Oreos like peanut butter or mint chocolate. Another idea is to layer the cheesecake filling with different cookies, such as chocolate chip or graham crackers, for a varied taste experience.
Adjusting Sweetness Levels for Dietary Preferences
Depending on personal dietary preferences, adjust the sweetness of the cheesecake. Tasting as you go will help you find the perfect balance for your filling.
Conclusion
In conclusion, making Decadent No-Bake Oreo Cheesecake Cups is not only easy but incredibly rewarding. The blend of creamy cheesecake filling, crunchy Oreo cookies, and a visually stunning presentation makes this dessert a crowd-pleaser.
Don’t hesitate to experiment with this recipe to suit your tastes or dietary needs. Whether you stick to the classic version or try out variations, this dessert is sure to bring joy to your table. So gather your ingredients, invite friends over, and enjoy the process of creating and sharing this delightful treat.